


Photo by Stephen Phillips - Hostreviews.co.uk on Unsplash
Definitive Guide for Oauth2 for Google Workspace and Nodemailer


Following the recent announcement that Less Secure Apps will phased out for Google Workspace starting from June 15, 2024, I've been exploring options for setting up OAuth2 for a client project. However, the guides I found were either outdated or too complicated, especially when it came to granting permissions. So, here's a straightforward guide to using OAuth2 (2LO) with Nodemailer.
We're opting for 2LO in this guide because it's better suited for server-to-server communication.
Prerequisites:
Google Workspace Account
Access to the Admin Dashboard in Workspace for Domain Wide Delegation
Step 1: Setting Up a Project
- Create a new project on Google Cloud or use an existing one.
Step 2: Enabling the Gmail API
Go to the API and Services section and select Library from the menu.
Search for Gmail and select Gmail API and click Enable.

Step 3: Creating a Service Account
Navigate to API and Services, then click on Credentials.
Choose to create new credentials and select Service Account.
Fill in the required details and click Done.

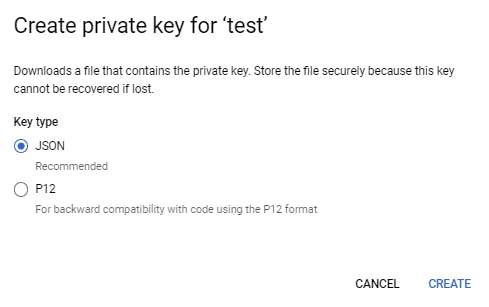
Under the newly created service account, go to the Keys tab and click Add Key.
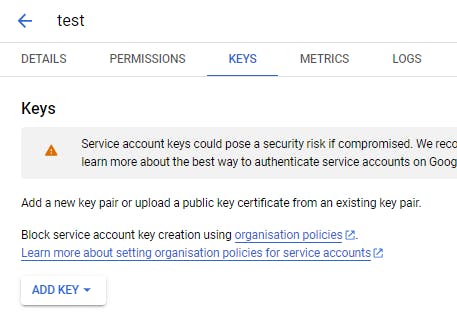
Choose Key type as JSON and click create. This will download the JSON file which will be used later.
Copy the Unique ID from the details tab.
Step 4: Domain Wide Delegation
Go to the Admin Console, then to Security, and select API Controls.
Click on Domain-wide Delegation or visit this link: https://admin.google.com/ac/owl/domainwidedelegation
Add a new entry, paste the Unique ID into the Client ID field, and add "https://mail.google.com/" under OAuth Scopes.
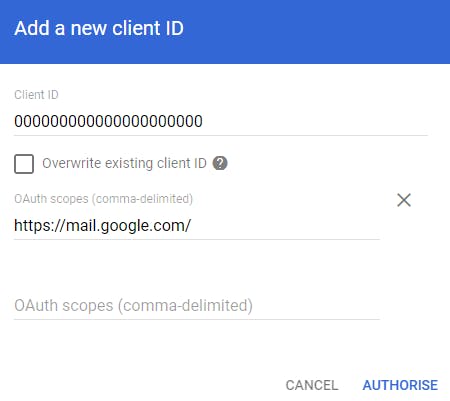
Click Authorize.
Step 5: Setting Up Nodemailer Transport
In the downloaded JSON file from Step 3, keep only the private_key, client_id, and token_uri.
Add a new key named user with values as the email associated with the project. This email will be used by the app to send out emails
For simplicity, rename the downloaded file to auth.json.
 let auth = require('auth.json');

 // For .env freaks, use btoa(JSON.stringify(auth.json))
 // and store the base64 output in .env auth key
 // const auth = JSON.parse(atob(process.env.AUTH))

 let transporter = nodemailer.createTransport({
   service: 'gmail',
    auth: {
     type: 'OAuth2',
     user: auth.user,
     serviceClient: auth.client_id,
     privateKey: auth.private_key,
     accessUrl: auth.token_uri,
    }
 });
That's it folks. If you encounter any issues or have questions, don't hesitate to reach out for further assistance. Happy emailing!